In Worldserver versions earlier than 11.6., use the
Generate Translation Kit Automatic action. Refer to this article for instructions:
WorldServer - How to configure the Generate Translation Kit Automatic Action and add it to your WorkflowStarting from version 11.6, the
Generate Translation Kit automatic action has been marked as deprecated and has been replaced with an automatic action called
Create Project Package, which also features the new caching mechanism introduced in WorldServer 11.6 (more information about this new feature can be found in the
Release Notes). The
Create Project Package Automatic Action is available out-of-the-box. The
Generate Translation Kit automatic action still works, but cannot create and export cached .tmx file.
Configuring the
Create Project Package Automatic Action works the same way as configuring the
Generate Translation Kit Automatic Action. Follow these steps:
The Automatic Action/Step
Create Project Package can be added to a Workflow to perform an export in the background and attach the exported package to a project attribute which can then be downloaded by the translator or reviewer.
1- The first step is to create a
Project Attribute. To create a
Project Attribute, go to
Management > Administration > Customization2- Next to
Custom Component Type, select
Attributes and click
Add to create a new
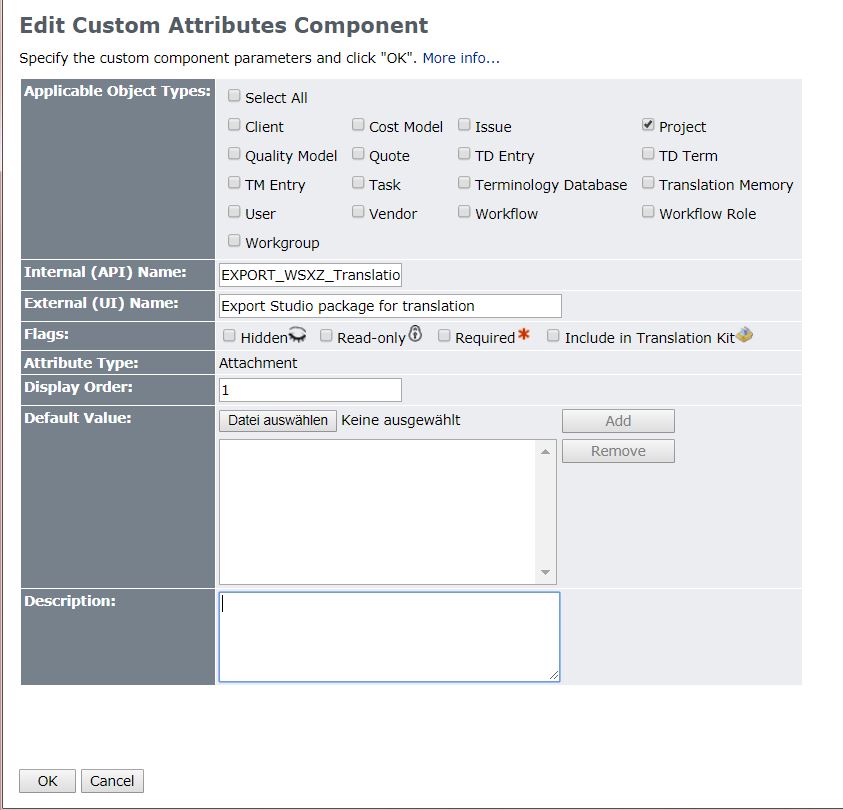
Project Attribute. The
Add Custom Attributes Component window will open up and you need to select the correct configuration. This is an example of such attribute where the Internal (API) Name is
EXPORT_WSXZ_Translation_kit and the External (UI) Name is
Export Studio package for translation:
3- The next step is to create a dedicated folder in
Explorer where the exported package will be stored. Open
Explorer and add such folder in the location of your choice. Let's assume the folder is called
export and is placed under a folder called
root. The directory in Explorer would be
/root/export4- Once the
Project Attribute is created, open the relevant
Workflow(s) in the
Workflow Editor and add the
Create Project Package to it. It is recommended to add such
Step before the
Translate step and - if needed - also before other human steps where translation/review in a CAT tool such as
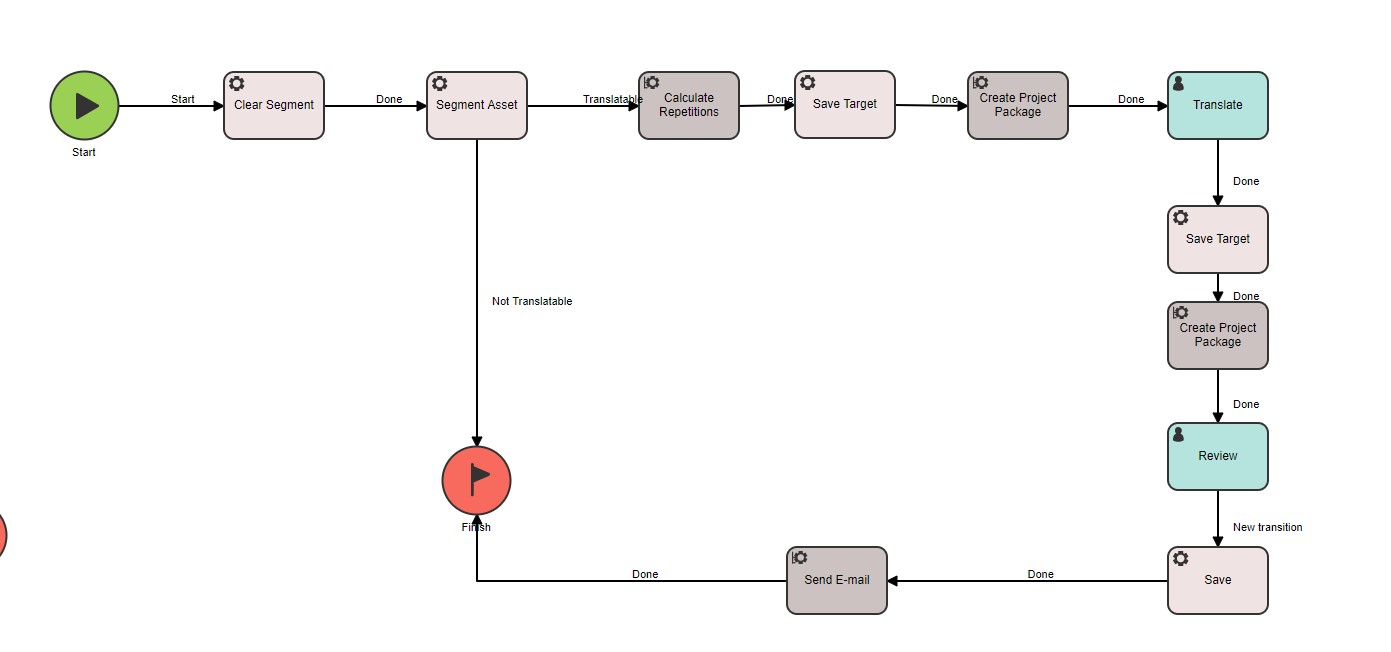
Trados Studio 2019 or 2021 is needed. This is an example of a simple workflow where the
Create Project Package is added before the Translate and the Review step:
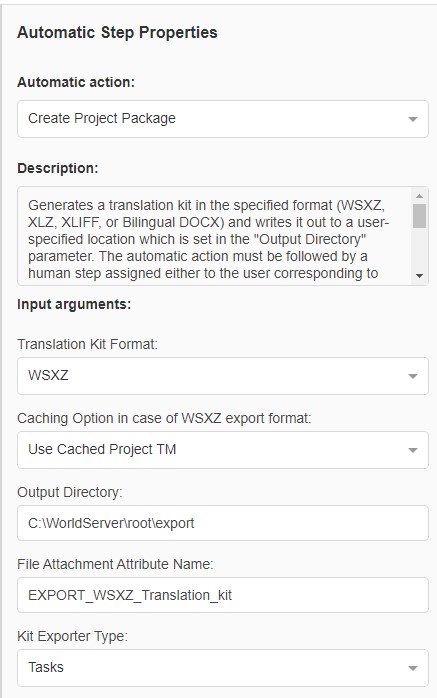
5- The
Create Project Package Automatic Action needs to be configured according to follow parameters:
Translation Kit format: select the desired export format. WSXZ, XLIFF and XLZ are available. Note that the XLZ format is
no longer supported and we also do not recommend to use the XLIFF format, especially not in a live tm mode system.
We recommend that the WSXZ format is selected.
Caching Option: in the case of WSXZ export format: the new feature of this Automatic action is that it uses cached TM, which makes the export much faster. Hence, we recommend using the default option:
Use cached project TM. However, you can also select
Create Project TM.
Output directory: this is the directory where the dedicated folder has been created, see also Step #3. Important: you need to refer to the
AIS properties of the mount under which the folder has been created and not to the
Explorer directory alone. Check under
Management > Asset Interface System > AIS Mountsand use the
Directory path to point to the folder created in
Step #3. In this case, since the folder root is associated with path
C:\WorldServer\root in the AIS Mounts, the path to the export folder would be
C:\WorldServer\root\exportFile Attachment Attribute Name: here you need to enter the INTERNAL attribute name. Make sure you do not enter the EXTERNAL attribute name because it will not work. If you are unsure what the internal attribute name is, double check the attribute settings (see
Step #2).
Kit Exporter Type: select
Tasks. Selecting
Assets is not supported if you want to use the
Cache Project TM capability. If you select Assets in combination with Caching Option
Cache Project TM you will encounter the error '
Invalid task id: -1 The export attempt failed. Details:<br>java.lang.NullPointerException'. If you need to use Assets as Kit Exporter Type, you will have to change the Caching Option to Create Project TM, which basically will do an export the "old" way, exactly as in
Generate Translation Kit.
 Important:
 if you select
Tasks, the next Workflow step
MUST be a human step, otherwise you will run into an error
as described in this article
:
Worldserver - Error at 'Generate Translation Kit' Workflow Step or 'Create Project Package' - 'Only human steps can be claimed! 'Moreover, in
WorldServer versions BEFORE 11.8.1, the
Project Submitter *must* be an assignee of the human step placed after
Created Project Package. If not, you will encounter this error described in this article:
WorldServer - Error at 'Generate Translation Kit' or 'Create Project Package' step - Pending claimant must be one of the assignees of the next task-stepHowever, the
article provides a workaround that includes setting a project attribute to a different user that will be assigned to the human step, making it possible for the project submitter not to be an assignee. Read the
article for more details.
6- Now add the
Create Project Package to your
Workflow and
Save your changes.
We recommend that a Test project is run to test the
Create Project Packagestep and confirm that it is configured correctly.