Follow these steps:
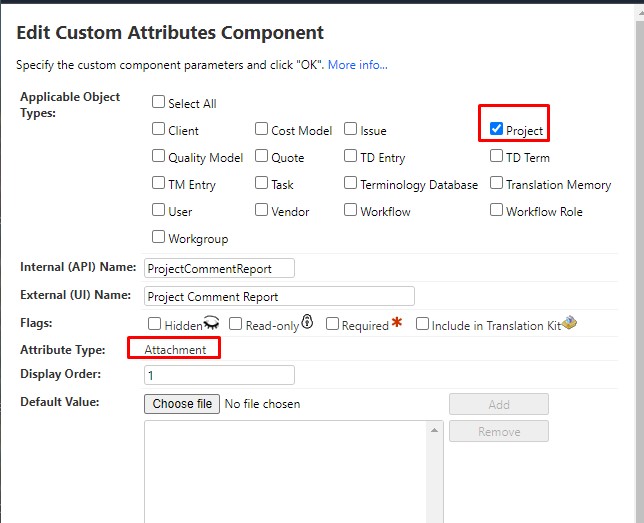
1- Create a Tasks attribute of type
Attachment and call it a name of your choice, for instance, Project Comment Report (external name) and
ProjectCommentReport (internal name). Here is what it could look like:

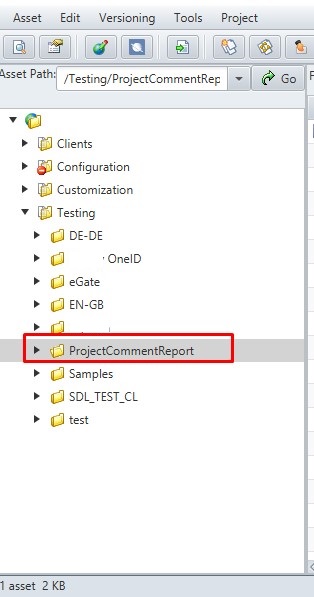
2- Create a specific folder in Explorer where the Project Comments reports will be stored. In the example below, I created a folder called
ProjectCommentReport.

In this example, the directory in Explorer is
/Testing/ProjectCommentReport. However, you should check the AIS property for the folder under which you have created your attributes folder by going to
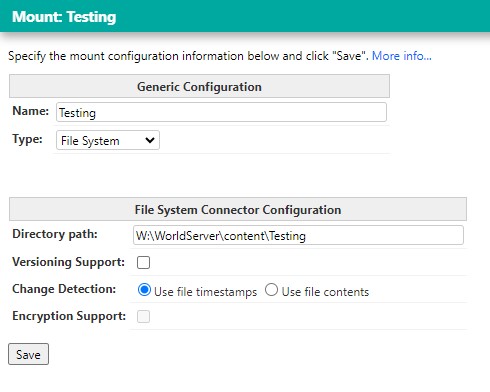
Management > Asset Interface System > AIS Mounts. In my test environment, the
Testing folder is associated with this location on the server:
W:\WorldServer\content\Testing
3- Add the automatic step
Generate Project Comment Report (LIB) to your workflow.
Important: make sure to use the
LIB version of the automatic action. Do not use the non-LIB version.
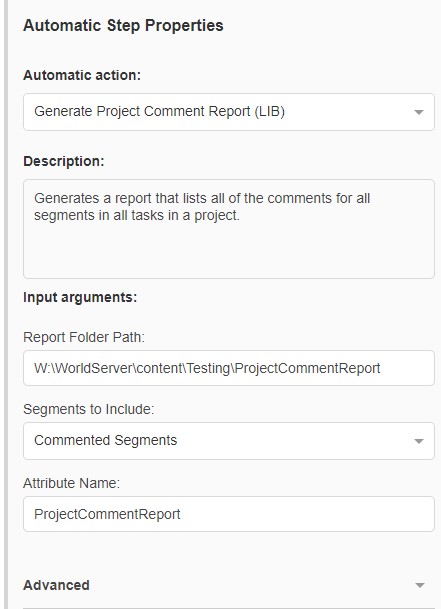
4- Associate this step with the TProject attribute created in #1 (use the internal name). This step creates the Project Comments report in XML format and adds it to each project as a Project attribute. In the
Report Folder Path field, you need to enter the AIS path:
Note the backslash instead of the forward slash in the path. This is the path that you will need to enter in the next step, when you configure the
Generate Project Comment Report (LIB) Automatic Action.

Once the Task reaches the
Generate Project Comment Report (LIB) step and the step is run successfully, you will find an entry in the Task information confirming that the report was created, where it has been stored and the name of the XML file. The naming convention will always include the project ID, project name and Task number. Example:
Completed Generate Project Comment Report (LIB) step of task 1 in time [00:00:00] on engine [xxxxx:clone#667585195:engine#4] with result Done. Execution output: Report has been saved to W:\WorldServer\content\Testing\ProjectCommentReport\project_34157_Test_Generate_Project_Comment.xml and attached to ProjectCommentReport.6- Once the workflow reaches the next human step after
Generate Project Comment Report (for instance, a
Review step), you will be able to download the report from the WorldServer User Interface and the Project's page. To do so, on the
Projects page, make sure to enable the column corresponding to the Project Attribute. In this case, the attribute's external name
Project Comment Report. Just click on it to download it.
You can also select the project and go to
Change Attributes to find the report.
7- Now simply click on the XML file to download it and find your
Project Comment Report. This is an example of the content of such a report. Note: comments are highlighted in bold.
<?xml version="1.0" encoding="UTF-8"?><project displayString="Test Generate Project Comment">
<task displayString="1" targetLocale="Italian (Italy)" sourceLocale="English (United Kingdom)">
<textSegment>
<sourceString>This is a house</sourceString>
<targetString>This is a house</targetString>
<comments>++++ Created by:testuser (Test User) at 7/3/24, 4:53:26 PM ++++
Comment segment 1 docx</comments>
</textSegment>
<textSegment>
<sourceString>Another {1}house{2} and a tree</sourceString>
<targetString>Another {1}house{2} and a tree</targetString>
<comments>++++ Created by:testuser (Test User) at 7/3/24, 4:53:35 PM ++++
Comment segment 2 docx</comments>
</textSegment>
</task>
</project>


