Here are the workarounds to fix the issue:
Workaround 11- Use the original WSXZ package that was exported the first time to create a correct Return package that will overwrite the error. Following this example, if the Task History reports this first entry related to an export in WSXZ format:
2/16/24, 2:57 PM Translator 1 Assets exported Exported asset(s) to WSXZask the translator to send you the original WSXZ package exported on February 16 2024.
2- Moreover: export the task in Autoerror to a new WSXZ package
3- Once you receive the original WSXZ package, open it in Studio and open the relevant file.
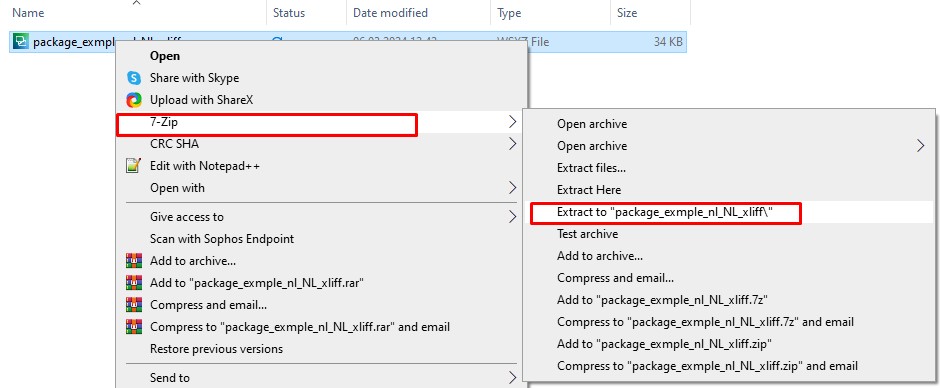
4- Extract the WSXZ package that you have exported from the Task in Autoerror using 7zip (WSXZ packages are archive files so they can be extracted with a tool like 7zip or others) and find the SDLXLIFF
5- In Trados Studio, use the SDLXLIFF from step #4 to Apply Perfect Match to the WorldServer project created when opening the original WSXZ package (step 3). Your file should now be fully translated.
6- In Trads Studio, go to
File > Save target as... and confirm that you can create a target file without errors.
7- Now create a new WorldServer Return package and upload it to WorldServer. The upload/import will have no error.
8- Finally, complete the Autoerror.
Workaround 2 This workaround is more technical.
1- Export the Task in Autoerror to a WSXZ package
2- If the project contains another task with the same format that is not in Autoerror, export that as well.
3- Now you have 2 WSXZ packages: one containing the SDLXLIFF file coming from the file in Autoerror and one coming from a task in the same format that has no issue.
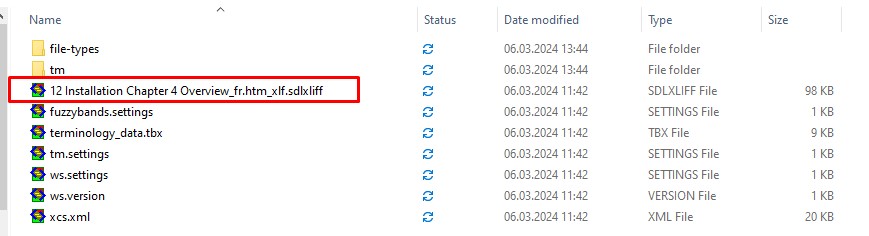
4- Extract each package to a folder using
7.Zip and open the folder. You will find the content of the WSXZ package, including the bilingual SDLXLIFF file. Example:


5- Open the SDLXLIFF files from each package folder in Notepad++ and set them next to each other. When looking at the beginning of the SDLXLIFF file from the task in Autoerror, you might notice that the encrypted content after
<internal-file form="base64"> is quite short and seems truncated if compared with the same encrypted content in the SDLXLIFF file from the task that has no error. Example from the encrypted content of the damaged sdlxliff file:
<internal-file form="base64">UEsDBBQAAAgIAPyEU1gAAAAAAgAAAAAAAAAQAAAAYWIyZnNwd2cuMnJ2LnhsZgMAUEsBAjMAFAAA
CAgA/IRTWAAAAAACAAAAAAAAABAAAAAAAAAAAAAAAAAAAAAAAGFiMmZzcHdnLjJydi54bGZQSwUG
AAAAAAEAAQA+AAAAMAAAAAAA
</internal-file>
Example from the not-damaged SDLXIFF file:
<internal-file form="base64">UEsDBBQAAAgIAAd3TFjjxAtnYQMAAM8NAAAQAAAAb2hxdzNsMHQudnZ3LnhsZu1XzW7bOBC+F+g7
EDz0Rim2ewhUWT0sUOwCCfbQLNArTY0kohSpJanYebYe+kh9hQ5JJ5INJ0hat3tZHwyR/PjNNz8c
St++fC3f73pFbsE6afSaLrILSkALU0vdruk/Nx/YJX1fvX5V7pRsmtevyBy7pAR3a7emo9WF4U66
QvMeXOFFETcUtRFjD9oXE7rYObmmnfdDkefb7TbbrjJj23x5cbHIP11ffRQd9JxJ7TzXAmgwilsK
F+evjOA+2n+WTRKnmDAWGA6Z81YKn+1cfa/mmtd/8OFAUM9rwQdnGr/lFjJh+jyJcnlCx/1BVxoW
3nLtVNT10XM/YkQ2o64V1LQKsLKRCsIDCUYLN3ABazpYcGBvk4eEGCtbqbnCyF6SP6//Ig48GQfy
N0b8VsI263y/hzozWgFMcd2OvEUq0Kzd7Bc9ty342WJj9yt7tUEMwz8Pdk33SzVH3XcDondoRiXZ
KLwDXoPdj3DsPquqhB1uRaVsciv9OgvNU/Iz3E5JXpV54HkgHTrugLXWjEM10aXpOX3ChWyv6Szk
9ABjjQDnTqDQ7nPJMeODgl/DzQekueXqCWYLIWAvIcVSinKeIEUIe0RymZ/KQCnMqH2anGgTWaok
EopdOi+Fo3OpceNcSWJK9eWNP3J+1NKvqYM2HFparco84p/NuGNu3DTKbE+wRo9ZeKbVxTHxfnzs
tzdGTUxhxGT94PMVdkZDFgtiV/QIlWITAcdLU9fELpRdvl2ustVyefn2GBcqj+u7KcL7JjSlq8wP
zmS5MfVdVU5+ToRB9GJmANvNfcCwC7FuvnaymKoyNZpqOs7Fw3nGM5wWS8wcu3/u7ed5Egjpk0nE
0KOFJO8RbuQJXWLGnNranAPvB4/UGqB2B6V9bhnJdHh4iPLjEV8+HvHh2QG/6eC+f5qGeBwFfdIR
NyjpidTexNnGKKx7LDhEi+C7IxvkrXGj0RFRbgZ/6HFy+GU3d/VG+Xd4bWkiFHcuSMbeUo8WbqRX
QN+0/l2Zo6mq51IT3DfifYZVWsLZzOfBfjKEpFVxrgL8lbH+z6N91nj/9kP5f2pelpoXNarVORrV
hxj5GGK8hJno+IDvhvPo3yEQ+f8dpYXgRXauc/tDpn97Cf+EypPZzON9Hz8q8vD6Hb7N8lgn1XdQ
SwECMwAUAAAICAAHd0xY48QLZ2EDAADPDQAAEAAAAAAAAAAAAAAAAAAAAAAAb2hxdzNsMHQudnZ3
LnhsZlBLBQYAAAAAAQABAD4AAACPAwAAAAA=
</internal-file>
5- Copy the encrypted content from the not-damaged SDLXLIFF file to the damaged SDLXLIFF file. Save the changes in the damaged SDLXLIFF file.
6- Now re-create a WSXZ package by selecting all files and folders inside the folder extracted from the WSXZ package, creating a ZIP file with
7-Zip and then renaming the ZIP file to *.WSXZ
7- Open the WSXZ package from step 7 in Trados Studio and open the sdlxliff file belonging to the WorldServer (Studio) project created after opening the WSXZ package. It should open without issues.
8- Check that the file is fully translated and try to create a target file (
File/Save target as...). If you can create a target file without errors, the problem is fixed.
9- Create a WorldServer Return package and upload it/import it. The import should be successful.
10- Complete the Autoerror. The
Save operation will be successful and the Task will move to the next step.