Starting from Version 11.8., the segment status of translated XLIFF files are recognized and hence the TM is updated.
For earlier versions, as explained in this
article, XLIFF is not a supported export format in a WorldServer
live TM environment. The WSXZ package format should be used.
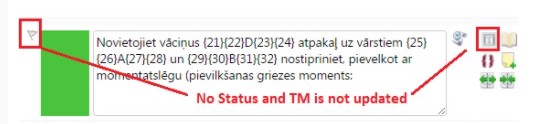
The reason for this is that before WorldServer version 11.8, WorldServer does not recognize the segment status set in a XLIFF file by the tool used to translate it. As a consequence, after import the segment status is set to
No Status and the TM is NOT updated, which is a critical issue.
This
article explains how to work around the issue when the project is still
active by working in Browser Workbench. It also explains that adding the
Set Translation Status Step to the workflow addresses the issue.
However, if the project is already
completed, you will need to be able to import the translation into the relevant Translation Memory. These are step-by-step instructions, assuming you have received a copy of the translated XLF file:
1- Open the translated XLF file provided by the vendor in Trados Studio by going to
File > Translate Single Document and browse to the XLF file. The file will be automatically opened and converted to SDLXLIFF file.
2- In Studio, go to
File > Save as... and save the translated, bilingual SDLXLIFF file in a folder of your choice. You will need it later to apply Perfect Match.
3- The next step is to find the completed project in WorldServer Explorer. If you are not sure where to find the project in Explorer, open the translated XLF file provided by the vendor in Notepad++ and search for the "
origin=" property, for instance:
original="/Clients/Tridion 2011/Projects/31497_Project test 2021/Source-English (United Kingdom)/grouped item properties.cmpx" 4- Open Explorer and find the project by navigating to the source folder, for instance:
/Clients/Tridion 2011/Projects/31497_Project test 2021/Source-English (United Kingdom)5- In Explorer, select the source file (in the example above,
grouped item properties.cmpx) and go
Tools > Export/Import and export it in XLF format. If the project contains multiple languages, make sure to select the right target language when exporting. Let's assume, the target language is Portuguese Brazil.
6- A zip file called
assets_pt_BR_xliff.zip is created by Explorer. The language code is part of the zip file name.
7- Unzip the ZIP file. You will see that it contains the actual exported XLF file.
8- Go back to Trados Studio and open the XLF file. The XLF file will be opened and automatically and it will be converted to SDLXLIFF format.
9- In Studio, now go to
Batch > Apply Perfect Match. The
Batch Tasks page will open up. Click
Next.
10- In the
SDL PerfectMatch window, select
Keep initial segment origin and status in the
After Matching section.
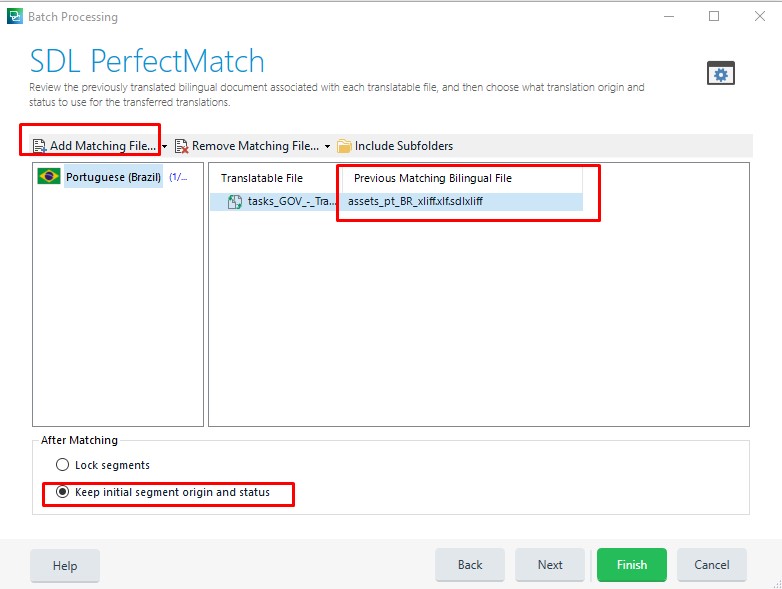
11- Click on
Add Matching File, select
Select Previous Document and browse and select the SDLXLIFF file created in Step #2. The translated SDLXLIFF file will be added as Previous Matching Bilingual File.
12- Click
Finish. Studio will apply the Perfect Match and will also ask you if you want to re-open the file. Click
Yes.
13- In Studio, check that all segments are translated. You will notice that the segments have no status. Confirm (Ctrl + Enter) all segments and set them to
Translated.
14- Save your change (
File > Save).
15- Now go to
File > Save target as... and create a target XLF file to a folder of your choice. This is the XLF file that you will import into the project in Explorer.
16- Find the file you have just saved as target (step 15) and zip it.
17- Go back to
Explorer and to the project. Select the source file. Go to
Tools > Export/Import and select
Import.
18- Now browse to the ZIP file from step 16 and import it. When importing, you will see some alerts related to segments that have no valid status. This is the issue with the XLF format. Ignore those and finish the import.
19- After the import is completed, right click the source file and select
Edit > In Browser Workbench to open the file in
Browser Workbench.
20- In Browser Workbench, change the segment view to
All except 100% and ICE Matches. This is workaround #2 of article
WorldServer - Segment Status set to "No Status" after import of translated XLIFF file and error 'Live translation memory was not updated for the following changed segments, because they were not assigned a translation status'21- Select all the segments that have been manually translated and have no segment status. You will recognize them by their green color.
22- After selecting all manually translated segments, click on the
Tools button and select Translation Status/
Pending Review or Translation Status/
Review (depending on the status you want them to be set).
23- Make sure the status has now indeed changed to
Pending Review or
Reviewed.
24- Click on
Save to update your TM with the translation.