Please be aware that there is a limitation of maximum 4 GB of file size when exporting any file - including TMX - in WorldServer. This means that exporting a large Translation Memory might fail if the resulting TMX file exceeds 4 GB.
We recommend using a
Workflow-based process to export
large Translation Memories. In order to configure this process, you will need to
- Create dedicated Attributes
- Create dedicated AIS directories in Explorer
- Create dummy file and place in the dedicated directory in Explorer
- Create a configure a dedicated Workflow
- Create a Business Rule
The steps below explain in detail how to set up such scenario::
1- Under
Management > Administration > Customization, select the Custom Component
Attributes2- Create an attribute called
TMX Export with Applicable Object Type
Project and
Translation Memory and of Attribute Type
Attachment as displayed below:

3- Create an AIS path (folder directory) in
Explorer. It is your choce where to create such directory and how to call the folders. In this article, we will use this directory:
/Testing/TM_Export/Default. This means that in
Explorer under the
Testing folder, you will need to create a
TM_Export folder and under the
TM_Export folder, you will create a
Default folder.
Important:
Keep in mind that this directory is just an example and you will use your own directory and folder.Note: A directory can be created in
Explorer by right clicking on the folder under which you want to create another folder, select
New. The
New Folder or Asset window will open up.
Select FileSystem Directory and enter the name of the folder you want to create with a name of your choice (see also screenshot below at step 5).
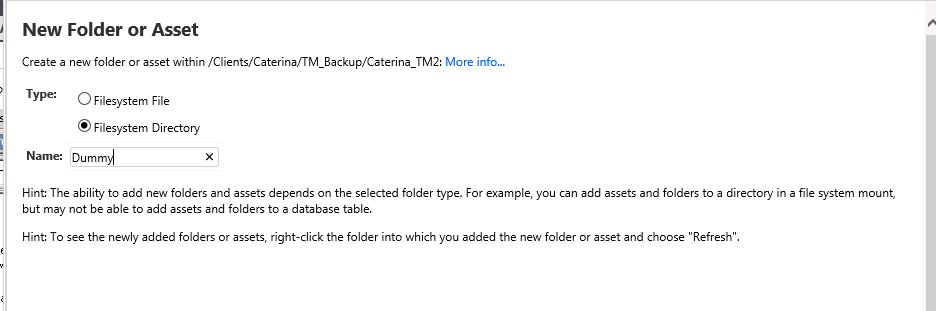
4- Right click on the folder, i.e.
Default, select
Properties and in the
Locale field, in the drop-down menu choose a locale and click
OK to save your change. Make a note of the locale you choose. You will use it when configuring the
Business Rule (step 12). It is irrelevant which locale. For this article, we will select
English (United States).5- Under the
Default folder, create another folder by right clicking on
Default and selecting
New. The
New Folder or Asset window will open up. Select
FileSystem Directory and enter the name of the folder you want to create with a name of your choice. In this article, we will use
Dummy. Make sure to assign the same locale to the Dummy folder as to the
Default folder, i.e.
English (United States) as explained in step #4.
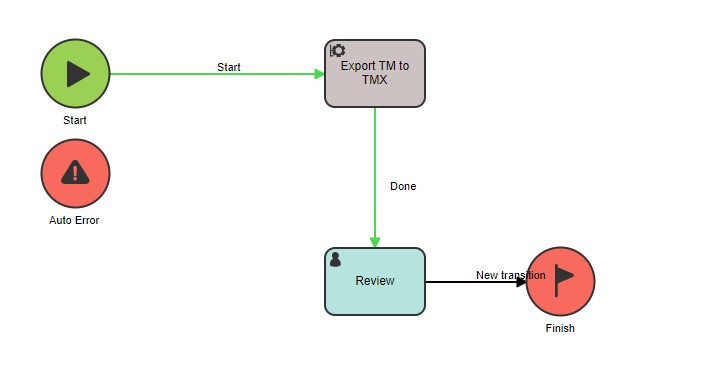
6- Create a
Workflow using the
Export TM to TMX Automatic Action and other Automatic Step. You could add a human step such as
Review (available out-of-the-box) or create a new Human step like
Download exported TM and assign it to you or to a workflow role. At this step, you will be able to download the exported TMX file from the project attribute associated with your project. This is a sample Workflow:
7- The
Export TM to TMX step needs to be configured. The TM name will be relevant and needs to match the actual TM that you want to export:
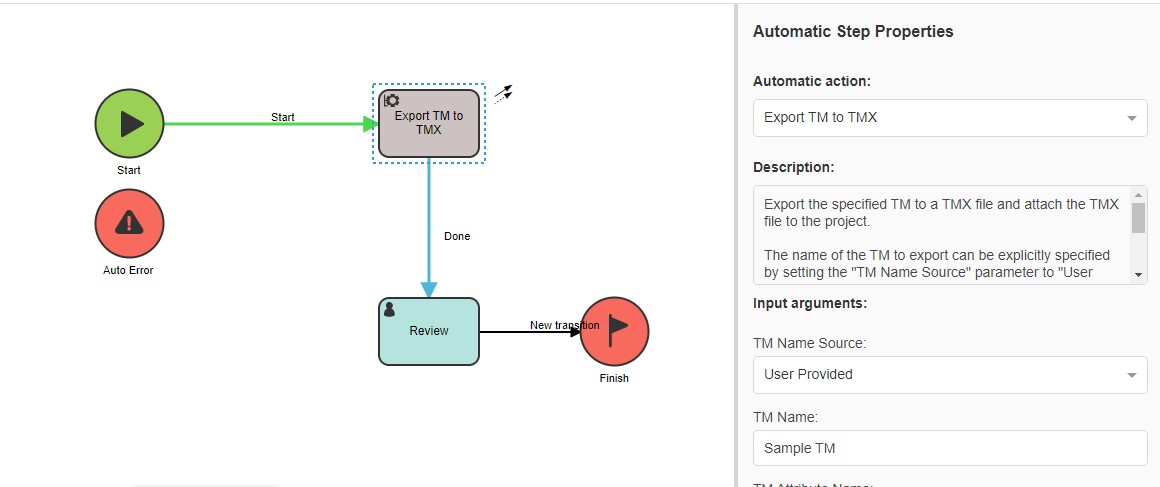
8- Save the
Workflow with a meaningful name, like
Export Test TM.9- You can associate the Workflow with a new
Rule (from
Management > Business Rule Linkage > Rules > Add) or with a
Project Type and run it to create a project as needed or based on a recurrence/schedule. The conditions needed for the rule are to be chosen from the available options followed by clicking the
Next button and
Save at the very end.
This is an example of a
Rule that exports the TM using the
Workflow above:

10- In order to run this rule which searches for assets under a certain folder, you need to place a dummy asset under the
Dummy folder you have created in Step 5. Just create a TXT file with one word in it. In the example above, the directory would result in
/Testing/TMBackup/Dummy. This is where you want to upload your dummy file to in Explorer. The file should never be deleted so whenever the rule is started, it will always find a file here, which is one of the conditions for the rule to run.
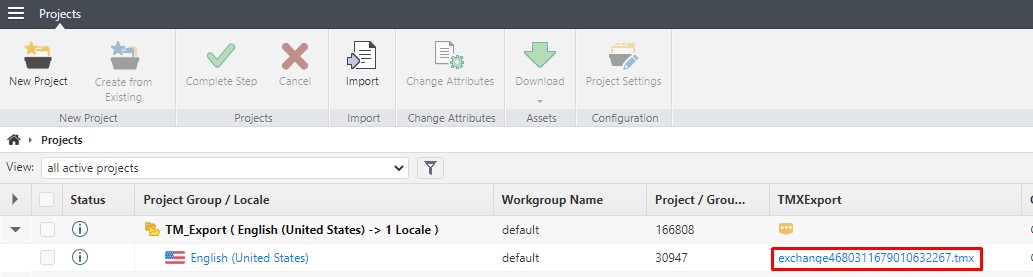
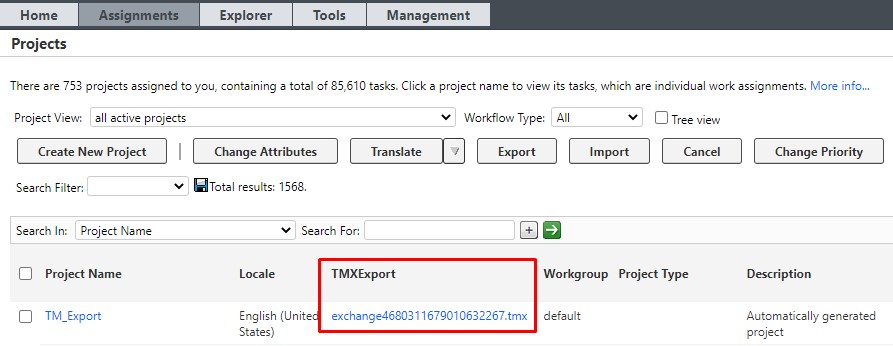
14- Once the rule has run and the project is completed, you will find the exported TMX as Project Attribute
TMXExport. Make sure
to enable the corresponding column in the
Projects page to view the exported TMX file which will always have a name like
exchange4680311679010632267.tmx (the numbers will value). Right click on the attribute (TMX file) to download it. While downloading it, if you want you can then rename it to the relevant Translation Memory name that you have exported.
Example in
Projects page (Legacy User Interface):
and in the
Projects page (new User Interface):