In the meantime, if you are not satisfied with the display of Trados Studio, MultiTerm and other RWS applications, you can follow one of the given workarounds/optimizations.
Workaround 1: Disable display scaling for specific applications
- Locate the Trados Studio (or other RWS application) icon on the desktop or Start menu.
- Right-click the Trados Studio icon.
- Choose Properties.
- Click the Compatibility tab.
- Under Compatibility mode from the dropdown menu, select Windows 7/8.
NOTE: This runs the program using settings from a previous version of Windows. - Tick the Disable display scaling on high DPI settings box.
- Click OK to confirm the changes.
Trados Studio should display correctly now.
NOTE: Possible questions/symptoms that might arise:
- You might not able to select Windows 8 under Compatibility mode because the drop-down only goes as far as Windows 7.
Microsoft introduced the Program Compatibility Assistant (PCA) feature in Windows 8 that helps you run desktop apps designed for earlier Windows versions. Windows 8 has a built-in application compatibility that enables applications designed for Windows 7 or earlier Windows versions to work on Windows 8 automatically. Therefore you might not see the Windows 8 in the drop-down list because it already runs in the Windows 8 application compatibility mode. - While starting, Trados Studio stops on the loading screen.
This behavior might appear in rare circumstances. We recommend reverting the changes for Disable display scaling on high DPI settings.
Workaround 2: If RWS applications appear “blurry”
Starting with Windows 8.1, the scaling adjustments for DPI apply automatically and you might see Trados Studio appear “blurry”. In previous versions, the scaling had to be adjusted manually.
The most common adjustment that provides the best results is to set the scaling to 125%. However, due to different settings/hardware, you might need to customize the settings until the best result applies for you:
- Click Control Panel > Appearance and Personalization.
- Under Display, click Make text and other items larger or smaller.
Optional: Press [Windows key + Q] and type in the search box: Make text larger. Then click Make text and other items larger or smaller. - Tick the Let me choose one scaling level for all my displays box:
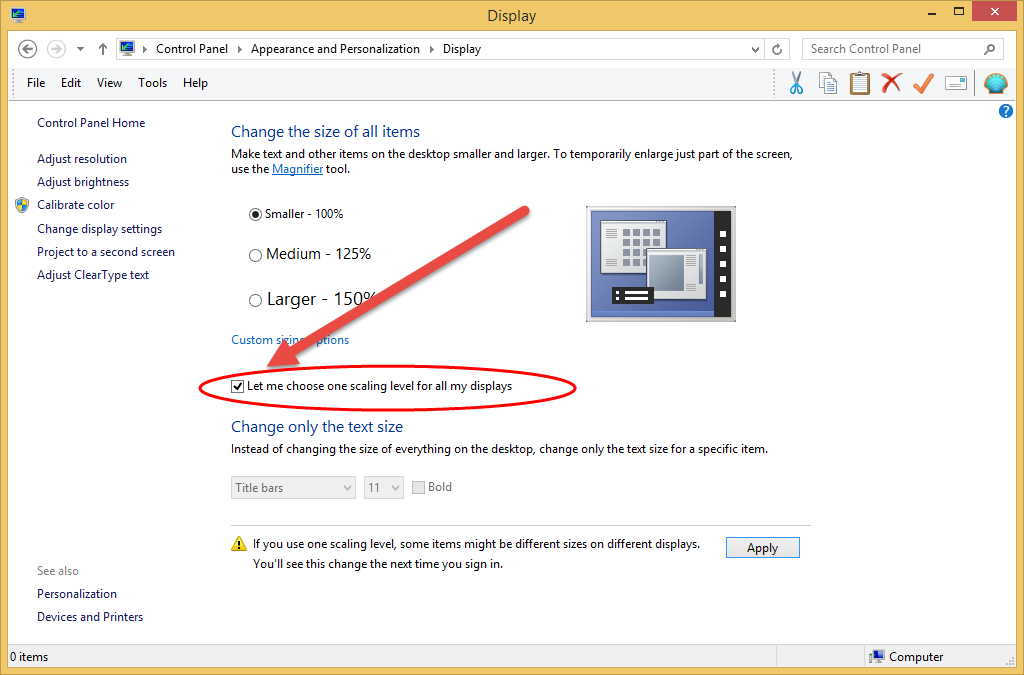
- You will see the following options:
- Smaller - 100%: This keeps text and other items at normal size.
- Medium - 125%: This sets text and other items to 125% of normal size.
- Larger - 150%: This sets text and other items to 150% of normal size. This option appears only if your monitor supports a resolution of at least 1200 x 900 pixels.
- Choose Medium - 125% and click Apply:
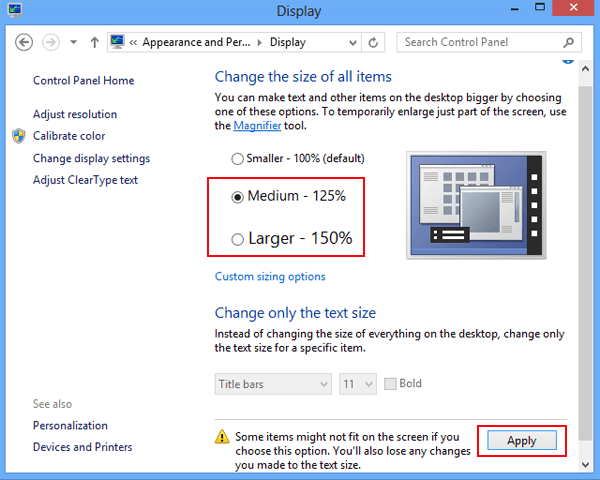
- Sign out of your profile and sign in again to see the changes.
Workaround 3: Change RWS application scaling behavior on high DPI displays
Important: before continuing with the resolution to the problem, first make a backup of your Windows registry, because unwanted changes cannot be made undone and may permanently harm your machine. To make a backup:
- Ensure all applications are closed.
- Open the Run... dialog by pressing
[Windows Button + R] - Type
regedit and click OK. - Right-click on Computer.
- Select Export from the short menu.
- Find a place on your local machine to save the file and give it a relevant name, for example: D:\registry backup\MyComputer_2015_October.reg.
- If anything goes wrong, double-clicking this file will restore your settings to the situation before you made the modifications.
Step 1:
- Ensure all RWS applications are closed.
- Open the Run... dialog by pressing
[Windows Button + R] - Type
regedit and click OK. - Navigate to the registry subkey:
HKEY_LOCAL_MACHINE\SOFTWARE\Microsoft\Windows\CurrentVersion\SideBySide - Right-click, select New > DWORD (32 bit) Value
- Type
PreferExternalManifest, and press ENTER. - Right-click PreferExternalManifest, and click Modify.
- Enter/type 1 for Value Data and select Decimal:
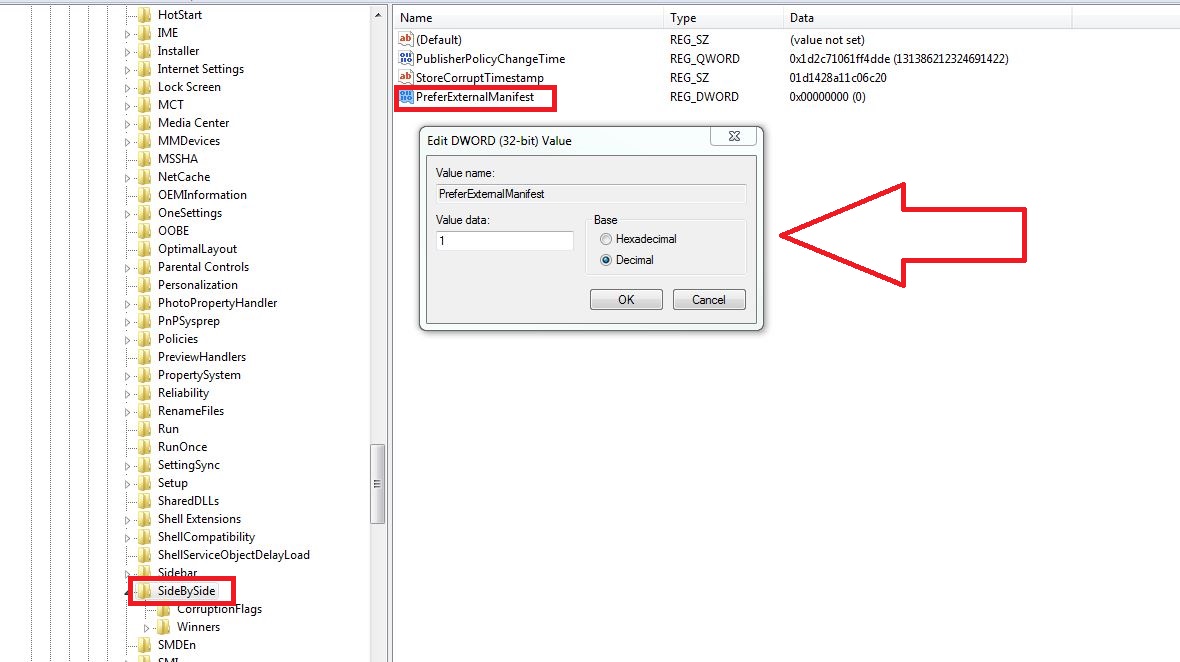
- Click OK.
- Exit Registry Editor.
Step 2:
For Trados Studio:
The next step is to place to the file SDLTradosStudio.exe.manifest that is attached to this KB article in the Trados Studio installation folder.
- Download the
SDLTradosStudio.exe.manifest.zip file (it contains the file SDLTradosStudio.exe.manifest) from the Attachments section below. - Extract the zip file on your local drive. Do NOT unzip the files onto an external hard disk or another partition.
- Place the
*.manifest file into the Trados Studio installation folder:
- On Microsoft Windows 32bit OS:
- For SDL Trados Studio 2014: C:\Program Files\SDL\SDL Trados Studio\Studio3
- For SDL Trados Studio 2015: C:\Program Files\SDL\SDL Trados Studio\Studio4
- For SDL Trados Studio 2017: C:\Program Files\SDL\SDL Trados Studio\Studio5
- For SDL Trados Studio 2019: C:\Program Files\SDL\SDL Trados Studio\Studio15
- For SDL Trados Studio 2021: C:\Program Files\SDL\SDL Trados Studio\Studio16
- For SDL Trados Studio 2022: C:\Program Files\Trados\Trados Studio\Studio17
- On Microsoft Windows 64bit OS:
- For SDL Trados Studio 2014: C:\Program Files (x86)\SDL\SDL Trados Studio\Studio3
- For SDL Trados Studio 2015: C:\Program Files (x86)\SDL\SDL Trados Studio\Studio4
- For SDL Trados Studio 2017: C:\Program Files (x86)\SDL\SDL Trados Studio\Studio5
- For SDL Trados Studio 2019: C:\Program Files (x86)\SDL\SDL Trados Studio\Studio15
- For SDL Trados Studio 2021: C:\Program Files (x86)\SDL\SDL Trados Studio\Studio16
- For SDL Trados Studio 2022: C:\Program Files (x86)\Trados\Trados Studio\Studio17
For MultiTerm Desktop:
The next step is to place to the file MultiTerm.exe.manifest that is attached to this KB article in the MultiTerm Desktop installation folder.
- Download the
MultiTerm.exe.manifest.zip file (it contains the file MultiTerm.exe.manifest) from the Attachments section below. - Extract the zip file on your local drive. Do NOT unzip the files onto an external hard disk or another partition.
- Place the
*.manifest file into the MultiTerm installation folder:
- On Microsoft Windows 32bit OS:
- For SDL MultiTerm 2014: C:\Program Files\SDL\SDL MultiTerm\MultiTerm11
- For SDL MultiTerm 2015: C:\Program Files\SDL\SDL MultiTerm\MultiTerm12
- For SDL MultiTerm 2017: C:\Program Files\SDL\SDL MultiTerm\MultiTerm14
- For SDL MultiTerm 2019: C:\Program Files\SDL\SDL MultiTerm\MultiTerm15
- For SDL MultiTerm 2021: C:\Program Files\SDL\SDL MultiTerm\MultiTerm16
- For SDL MultiTerm 2022: C:\Program Files\Trados\MultiTerm\MultiTerm17
- On Microsoft Windows 64bit OS:
- For SDL MultiTerm 2014: C:\Program Files (x86)\SDL\SDL MultiTerm\MultiTerm11
- For SDL MultiTerm 2015: C:\Program Files (x86)\SDL\SDL MultiTerm\MultiTerm12
- For SDL MultiTerm 2017: C:\Program Files (x86)\SDL\SDL MultiTerm\MultiTerm14
- For SDL MultiTerm 2019: C:\Program Files (x86)\SDL\SDL MultiTerm\MultiTerm15
- For SDL MultiTerm 2021: C:\Program Files (x86)\SDL\SDL MultiTerm\MultiTerm16
- For SDL MultiTerm 2022: C:\Program Files (x86)\Trados\MultiTerm\MultiTerm17